AEM Brute Force Oil-less Air filter |
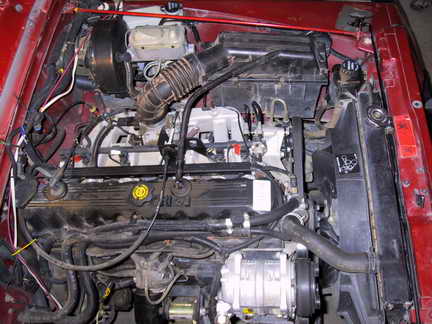
AEM introduces its new oil-less air filter kit for the Wrangler YJ 4.0l, 1991-95. 
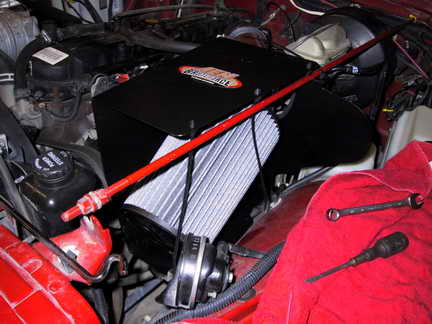
AEMs new Brute Force air induction kit for the fuel injected 4.0 YJ uses a newly developed synthetic dry filter material. Independently tested by Southwest Research Institute in San Antonio, Texas at 98.4% new and a cumulative 99.4% filter efficiency, it is capable of filtering down to 1 micron. The typical initial efficiency of an oiled cotton filter is only 90% to 95%. Southwest Research Institute has been performing related tests for various types of automotive producers for decades. The independent test results are located at AEMs web site. They also tested against K&Ns popular cotton oiled filter at SwRI. The test results showed the AEM synthetic dry filter had better filtration and airflow while holding a larger dirt load. Also, it never needs oil. The oiled filters becomes overwhelmed with dust and can result in a restriced and ineffective filter. Excess oil pulled down the air tube can also damage mass air sensors. This will not be a problem with the new Dry Synthetic filters. The increased filter area also means that the airflow will be less restrictive than K&N in similar off road driving conditions. 
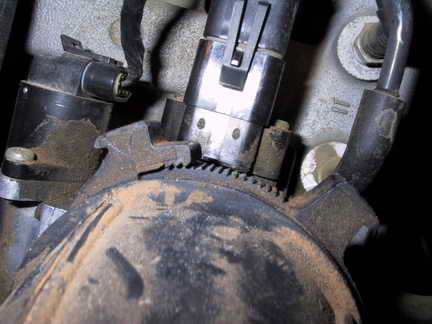
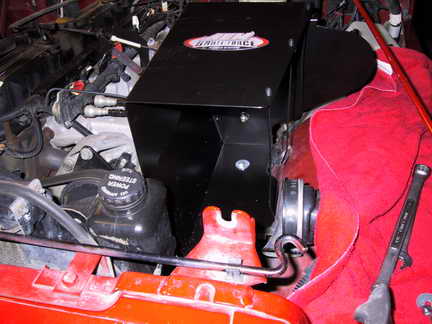
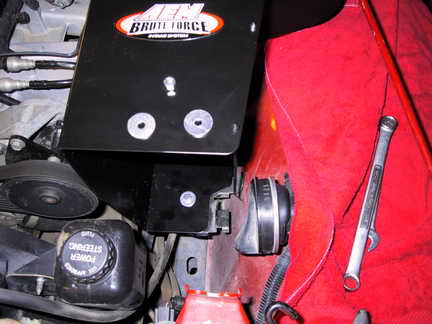
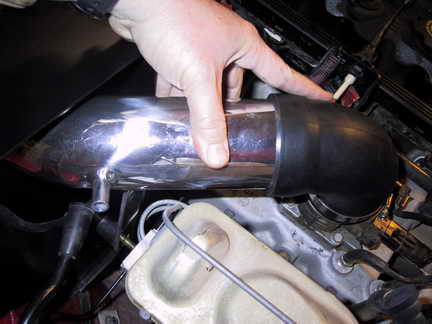
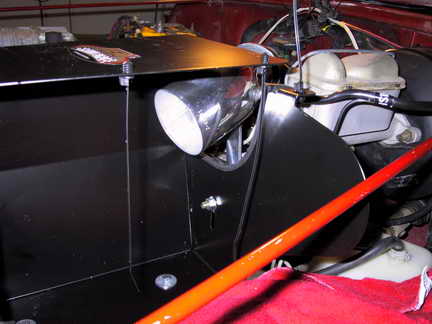
The air tube is coated with a zirconia based powder coating. This is helpful in reducing heat. Infra-red heat from the engine and radiator is reflected from the tube. This helps keep heat transfer to the air in the intake to a minimum. Also the volume and speed of the air passing through the tube is so great, any heat transfer will be null. The black shield directs cooler incoming air to the filter while protecting the filter from water and splash debris. Every Brute Force air induction kit is tested on a dyno for individual engine applications and designed to produce the most power in the best rpm range. They tune the size and length of the tube for the best airflow with the intake manifolds volume and engine RPM. AEM also dyno tests with and without throttle body spacers. If the application benefits from a TB spacer it is shipped with the Brute Force kit. The filter is cleanable and easy to maintain. Since there is no oil to hold dirt in place, it can benefit greatly from occasional removal and tapping to remove larger quanties of dirt than an oiled filter can. The new synthetic material used is hydrophobic, it will not absorb water, and will dry quickly. The interior of the dry flow filter is supported with an internal cage to help maintain the filter's shape under severe conditions. It is a well constructed filter that should last beyond the life of the vehicle. AEM also makes available generic fit cone filters of many sizes to replace filters from other kits. They produce numerous drop in replacement filters for OEM boxes. Please check out their web site at www.aempower.com . |
The YJ brute force install. |
---|
The unit came in this informative box. It was well packed with tons of styrofoam peanuts. (that's a lot since they weigh nothing)
|
||
---|---|---|
List of materials for Part # 21-8305 |
|
|
1 - upper intake pipe 1- heat shield 1- air filter assembly 1 - 13" rubber hose 1/2" 1 - rubber isolation mount 2 - washers M8 1 - 12" of trim
|
1 - #48 hose clamp 2 - bolts 1/4 20 X 3/4" 2 - nuts nylock 1/4 20 1 - Instruction kit 1 - cleaning kit 2 - silver decals (AEM) 4 - washer 6mm flat
|
Here you can see the dust that the K&N let through. This is at the throttle body end of the tube. |
Again, more dust. You can see the finger drag marks in the tube where we wiped the dust. |
---|---|
We installed this kit on a 94 YJ sporting 4:56 gears and 33 inch tires. The owner had rigged a TJ air tube with a K&N filter and the pre filter sock that stretches over the filter. The K&N filter helped power and gas mileage from a dismal 14mpg to 15 mpg. However when we removed the tube and filter, we found a heavy coating of dust on the inside of the air tube. This was indicating that the K&N was letting significant contaminants into the engine. The K&N only had 2k miles on it. After a 600 mile round trip to Hole In The Rock in Utah, the tester reported a notable increase in gas mileage. The YJ averaged 15 mpg before installing the Brute Force. Fuel comsumption increased to 18mpg on the trip south and 22mpg on the return. On the way home he drove about 55mph on a scenic loop. Also noted was the extra power on hills where it was needed. The next weekend we ran Hell Roaring Rim, northwest of Moab. Running 70mph on the way down the YJ consumed 16mpg with a head wind. Thats up from the average 14-15mpg. On the return to Grand Junction, the Wrangler averaged 17.5, a very impressive increase over the stock airbox. |
This is where the K&N was mounted. Look at the amount of ring and valve seat eating dust. |
To start the install, make sure the vehicle is in a safe level area. Set the parking brake, and make sure the engine is cool. This install will take anywhere from 1/2 hour to 4 1/2 hours depending on how much beer and pizza is consumed. Open the box and account for all the parts on the part list. READ THE FACTORY INSTRUCTIONS FIRST. They are included for a reason. This write-up is only a guide. |
---|
Here is the stock setup. We need to remove the stock air box, and disconnect the attached hoses. |
|
---|---|
To remove the air intake from the throttle body, you need to release the clamp. In order to do that you must get a small screwdriver under the teeth. |
|
Here is a close-up of the clamp. Take a pair of channel locks and squeeze the clamp. This will allow you to get a small flat screwdriver under the grabbing teeth. Release the channel locks and spread the clamp open with your fingers. |
|
Pull the airlines from the box and tape/tie them out of the way. |
|
Open the lid to the air box and remove the filter and lid. Then remove the two bolts that hold the box to the bracket. There are nuts under the bracket so you need to reach under with a box wrench. Use an extension ratchet in the box. Remove the tube leading to the wall below the headlamp. |
|
You are ready to start installing the shield. There should be nothing left of the old air intake system. |
|
Place the air shield on a bench that will not scratch the surface. Install the zip ties into the holes provided. Three zip ties on the large side face inward. |
|
The other zip tie on the end faces outward. |
|
Place the rubber isolation mount in the elongated hole and put a washer less nut on the back to hold it in place. DO NOT TIGHTEN YET. |
|
Install the Rubber Liner on the curved edge, you may use some adhesive, we did not. |
|
Trim the excess liner. |
|
Loosen the nuts holding the front clip rod. Turn only one of them, and remember which one you turned. You do not want to mess up the alignment. |
|
Pull the rod gently up and out of the way. It will flop around a bit, but not much. |
|
Remove the rubber grommets on the mounting bracket in the Jeep. Put them inside the stock air box for storage. Should you wish to move the system or sell the Jeep you can reinstall the stock box. |
|
The two mounting bolts fit here in the two holes. This one lined up fine with the grommet-less holes. |
|
You have to use the washers on the bottom in the larger holes of the Jeeps bracket. It left ample room for adjustments. |
|
The shield is installed loose. |
|
Here are the nylock nuts and washers that go under the factory bracket. |
|
Do not over-tighten the bolts. You may need to move the box around for fit. |
|
Make sure the air tube is clean inside, those packing peanuts tend to stick to things. Also don't forget to pull the rag out of the tube that you left after cleaning it. With the box in place, loose fit the elbow and pipe. Use the #44 clamp and snug the elbow on the throttle body. Make sure you can move it though so you can fit all the other components. Place another hose clamp (1-1/16" ) on the end that accepts the air tube. Again snug the clamp enough to hold it, but loose enough to maneuver. |
|
Insert the air intake bracket into the rubber isolator and tighten it enough to hold it but not too tight, as you may need to adjust. |
|
Attach the charcoal vent line. Use a smaller hose clamp on the hose. Go figure, using a hose clamp to clamp a hose... |
|
Adjust the pipe for clearance and placement. |
|
Use the 13" of breather hose and the other small hose clamp.
You do not, or should not, need to use a hose clamp the the engine side of this hose. It is, or was before you broke it trying to remove the old hose, barbed and should hold the hose tight.
AEM gave us tons of room for adjustments |
|
Use the final 1-1/16" hose clamp on the end of the filter and place it in for fit. The filter should not touch anything. |
|
Slip the front clip rod back in place and tighten. Make sure you tighten the nut you moved to loosen. If not, you can mess with the front clip position. |
|
Since everything is still loose, you can move the shield and pipe around for best clearance and fit. Tighten the hose clamps on the throttle body and the air tube. Do not tighten the air filter clamp yet. | |
The horn was touching and we had to bend it out of the way a bit.
|
|
After fit and clearance is OK, remove the air filter, and tighten the two bolts that hold the shield to the factory bracket. |
|
Replace the filter and tighten it down. Double check all fittings, especially the rubber mount on the air tube bracket. Loosen that nut and position the mount for least stress on the rubber and tighten BOTH nuts. |
|
Check one more time for proper fit. Attach the zip ties to the front clip rod. |
|
We had the first two tags go in, the third zip tie tag pulled out toward the fender, and of course the one facing up pulled toward the fender. |
|
It is a nice clean install. Double check the fittings and clearances. |
|
It is completed. |
|
Just another shot for your viewing enjoyment. |
|
A clean well-thought product. |
|
Just in case you worried about the view from behind, you know how picky the judges are at the car shows. |
|
Don't forget to remove the plastic from the badge. |